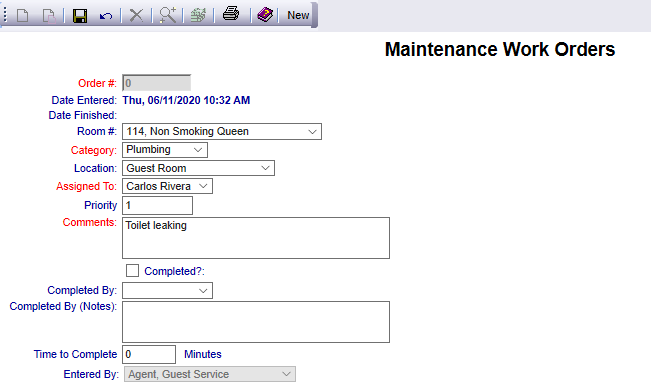
Maintenance Work Orders allow you to add, edit, and track work that needs to be done at your Property.
When you create a work order, you can assign it to a Room or Building. You can assign a category, further define the location of the work that needs done, assign it to a maintenance worker, assign a priority level, and provide additional comments.
Once the work order has been completed, it can be noted on the work order along with the maintenance worker that completed it and any additional comments.
Note: Work orders may also be generated via the Housekeepers Dashboard, where the housekeeper assigned to a room may enter a maintenance request if they note something requiring attention or repair (such as a leaky tap or broken chair) in the room that they are servicing. These maintenance requests will appear automatically on the Maintenance Work Orders screen after submission.
The Add/Edit Work Orders command is in the Maintenance Menu.
Depending on your Skyware Systems set-up, you may or may not have a quick menu option for Maintenance =>.
If you can, Select Maintenance => from the Quick Menu on the left side of the screen, to open the Maintenance Menu screen.
Or you can reach the Maintenance Menu via the Housekeeping Menu using the Full Menu.
Click the icon on the left for the Full menu.
This will display the Full menu in a tabular form, with four sections, Registration, Status, Cashier and Other.
From the Other Section, select Housekeeping =>.
The Housekeeping Menu screen will open when accessed.
The Housekeeping Menu has two sections, Housekeeping Menu 1 and Housekeeping Menu 2. Maintenance => is in Housekeeping Menu 2.
When accessed the Maintenance Menu screen will open.
This menu has two sections, Maintenance Status and Maintenance Printing. Add/Edit Work Orders is in the Maintenance Status section.
When selecting the Add/Edit Work Orders command, the Maintenance Work Orders screen will open.
The screen display is split into two frames, with the left side of the screen listing any existing work orders, and the right side containing the fields you need to complete in order to add or edit a work order entry for your property. Any changes made on the right, once saved, will be updated in the listings to the left
Your current work orders show the order number assigned to them, the work order priority, the date it was entered, the location and/or room number where the work is needed, if the work order has been entered into Skyware Systems as completed, and any additional comments.
Your work orders can be sorted using any of these options, barring Comments. By default, the Date Entered is used, with the most recent work order entry first.
Note: If a work order displayed here has been completed and you now designate it as such here, it will be REMOVED from this screen if the Completed display option is "No". To display any COMPLETED work order entries you will need to type "Yes" into the Completed option box, which will then display completed work order entries ONLY.
Selecting a work order from this list on the left side populates the right side of the screen with the details of the work order.
You can use the form to make changes to the work order as needed. When finished, click the Save icon from the toolbar above the form. If necessary, use the Cancel button to undo any changes.
Your options include the following:
Generate a new entry:
Click the New button from the toolbar to add/create a new work order entry.
Complete the fields described below.
OR:
Select an existing work order entry from the list on the left, and click the Replicate button from the toolbar. Then change the field information as described below.
Edit the current selection:
Change the field information described below.
Order#: This is a work order number AUTOMATICALLY generated by Skyware Systems when the work order is saved.
This field is required.
Date Entered: The date that the work order was generated will be recorded here, when the entry is saved.
Date Finished: If a work order is completed, the date that the work order completion was entered will be recorded here, when the entry is saved.
Room #: This is a drop-down menu listing all the room numbers AND their types configured for your Property.
Select one.
Note: The Room # field is not required, HOWEVER one of the two fields from Room # or Location should be filled.
Category: This is a drop-down menu of your configured Maintenance Category types, to assign the work order to.
Select one.
This field is required.
Location: This is a drop-down menu containing your Property's configured non-bedded/non-numbered rooms. If the maintenance is required is not in a numbered room, it should instead be selected here.
Note: The Room # field is not required, HOWEVER one of the two fields from Room # or Location should be filled.
Assigned To: This is a drop-down menu of the names of those people designated as being in your Maintenance section.
Select someone to assign the work order to.
This field is required - SOMEONE must be assigned to a work order.
Priority: Enter the Priority level of the work order here. 1= High, 2= Medium, 3=Low.
Comments: You must enter a comment into the field here, describing the nature of the work order (for example, a leaky toilet, or a broken chair).
This field is required.
Completed?: Has the work required in this work order entry been completed? If so, check this box. by default it is unchecked.
Completed By: Once again, this is a drop-down menu of the names of those people designated as being in your Maintenance section.
Select one. This may or may not be the person the work order was assigned to.
Completed By (Notes): this field should have any comments regarding what was done to complete the work order entry.
For example, a leaky toilet may have been removed and replaced.
Time to Complete (minutes): Enter how long the work order took to complete, in minutes, into this field.
Entered By: This field is AUTOMATICALLY completed by Skyware Systems as the person currently logged into the system.
When you are finished adding or editing a work order entry, click the Save button to save the changes.
To view any changes made, click the Activity log button in the local tool bar.
You can also delete a work order or print the CURRENT work order shown on the right side of the screen, using the local tool bar.
Note: For more printing options you should use the Print Work Orders command, also on the Maintenance Menu.
Date Updated October 12, 2022